
Publishing a blog post takes time. You research a topic, write useful information, add images, optimize it for search engines, and finally publish it. But what happens after publishing? Many bloggers share the article once on social media and then move on to their next topic.
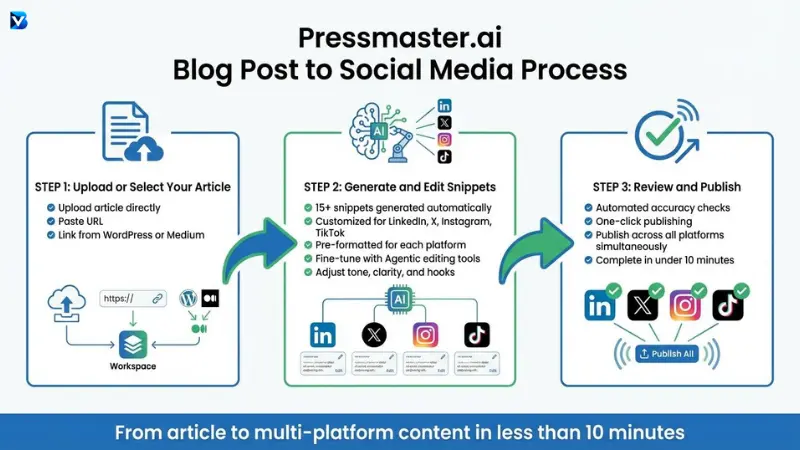
This is where blog post repurposing becomes useful.
Instead of creating new content for every platform, you can use artificial intelligence (AI) to transform one existing article into multiple social media posts. These can include LinkedIn updates, Instagram carousels, Facebook posts, X threads, Pinterest pins, and short-form video scripts.
You can also automate much of this process using tools such as ChatGPT, n8n, WordPress, Google Sheets, and Buffer.
In this guide, you will learn how to turn one blog post into 10 different social media posts, write platform-specific content with AI, and create an automated workflow that prepares content for review and scheduling.
What Is Blog Post Repurposing?
Blog post repurposing is the process of converting an existing blog article into different content formats for other platforms.
For example, imagine you have published a 2,000-word article about AI automation.
Instead of writing ten new pieces from scratch, you can extract its most useful ideas and turn them into:
- LinkedIn posts.
- Instagram carousel content.
- X threads.
- Facebook updates.
- Pinterest pins.
- Short-form video scripts.
Each post communicates a different part of the original article.
The goal is not to copy and paste the same text everywhere. It is to adapt the original information to the audience and format of each platform.
This approach is different from simple cross-posting. Cross-posting shares the same content across multiple channels, while repurposing transforms the original idea into a new format.
Why Should You Repurpose Blog Content?
Creating valuable content requires research, time, and effort. Repurposing helps you get more value from that work.
Here are some important benefits.
1. Save time on content creation
You do not need to research a new topic every time you want to publish on social media.
AI can extract important ideas from an existing article and turn them into different drafts.
2. Reach audiences on different platforms
Not everyone reads blog articles.
Some people prefer Instagram carousels, while others enjoy LinkedIn discussions, short videos, or Pinterest graphics.
Repurposing makes your information accessible in different formats.
3. Maintain a consistent publishing schedule
A single article can provide several content ideas for your weekly social media calendar.
You can prepare the posts together and schedule them for different days.
4. Improve content distribution
Publishing an article is only one part of content marketing. Distribution helps introduce that article to people who may not discover it through search engines.
Sharing different insights from the same article creates additional opportunities for readers to visit your website.
5. Build brand consistency
Using an AI prompt that includes your preferred tone, writing style, and audience can help maintain a recognizable brand voice across platforms.
However, every post should still be reviewed before publishing.
10 Social Media Posts You Can Create From One Blog
One useful article can provide multiple content formats. Here are ten practical examples.
| No. | Content format | Platform | Main purpose |
| 1 | Professional insight post | Share an important takeaway | |
| 2 | Educational carousel | Explain a process | |
| 3 | Content thread | X | Break down the main topic |
| 4 | Short educational update | X | Share one useful tip |
| 5 | Educational carousel | Explain ideas visually | |
| 6 | Quote graphic | Highlight an important statement | |
| 7 | Discussion post | Encourage conversations | |
| 8 | Educational pin | Attract visitors to the article | |
| 9 | Short video script | Instagram Reels/TikTok | Explain one useful idea |
| 10 | Educational video script | YouTube Shorts | Present a quick tutorial |
Let’s understand how each format works.
1. Create a LinkedIn post
LinkedIn is useful for sharing professional insights, business lessons, and practical tutorials.
Extract the most important takeaway from your article and write a short post around it.
Example:
One blog post can do more than bring traffic to your website.
You can turn it into:
- A professional LinkedIn update.
- A step-by-step tutorial.
- A list of practical tips.
- An educational carousel.
- A short video script.
The key is to share useful information instead of simply asking people to visit your website.
Read the full guide for more details.
2. Create a LinkedIn carousel
A LinkedIn carousel can explain a complex idea through multiple visual pages.
For example, an article about AI automation can become a six-slide educational document:
- Title: What Is AI Automation?
- Why Businesses Use AI Automation.
- How an AI Workflow Works.
- Tools You Need.
- A Practical Example.
- Final Takeaway and Website Link.
Use Canva to design the slides. AI can prepare the slide text and visual instructions.
3. Create an X thread
An X thread breaks a larger topic into connected, short posts.
For example:
Post 1: Want to create more social media content without writing everything from scratch?
Post 2: Start with one useful blog article.
Post 3: Extract its five most important ideas.
Post 4: Turn those ideas into individual social media posts.
Post 5: Convert a step-by-step section into a carousel.
Post 6: Create a short video script using one important lesson.
Post 7: Schedule the posts throughout the week.
Post 8: Review their performance and reuse the strongest ideas.
Add a link to your original blog article where appropriate.
4. Create a short X update
Not every social post needs a long explanation.
Extract one practical tip from your article and present it as a standalone update.
For example:
“Stop writing every social media post from scratch. One useful blog article can become multiple posts when you extract different ideas and adapt them to each platform.”
5. Create an Instagram carousel
Instagram is particularly useful for visual educational content.
Turn the main steps of your article into a series of slides.
Example carousel:
- Slide 1: One Blog Post = 10 Social Posts
- Slide 2: Find the Main Idea.
- Slide 3: Extract Five Useful Points.
- Slide 4: Generate LinkedIn Content.
- Slide 5: Create Instagram Carousels.
- Slide 6: Write Short Video Scripts.
- Slide 7: Schedule Your Content.
- Slide 8: Review and Improve.
Use a consistent font, design, and brand identity.
6. Create an Instagram quote graphic
Find one meaningful sentence in your article.
Turn it into a simple graphic using Canva.
For example:
“Create once. Repurpose intelligently. Distribute consistently.”
Add your website name and a relevant visual.
Do not present an AI-generated statement as a direct quotation from your article unless it actually appears there.
7. Create a Facebook discussion post
Facebook posts can introduce a useful idea and encourage people to share their opinions.
Example:
“Do you write every social media post from scratch?
There is another approach. Start with a useful blog article, extract its best ideas, and turn them into different posts for your audience.
What type of content do you prefer: educational posts, short videos, or visual carousels?”
8. Create a Pinterest pin
Pinterest can help people discover visual educational content.
Create a vertical pin with:
- A clear headline.
- A relevant illustration.
- A short explanation.
- Your website URL.
Example headline:
“10 Ways to Repurpose One Blog Post with AI”
Use a descriptive Pinterest title and description to explain what readers will learn.
9. Create an Instagram Reels or TikTok script
Short videos can explain one idea from your article.
Example 30-second script:
Scene 1: Show a blogger publishing a new article.
Voice-over: “You just spent hours writing a blog post. But did you know you can use that same article to create more content?”
Scene 2: Show the article transforming into different social media formats.
Voice-over: “Use AI to extract the important ideas and turn them into LinkedIn posts, Instagram carousels, and short video scripts.”
Scene 3: Show an automated content calendar.
Voice-over: “Then organize your drafts and schedule them throughout the week.”
Final scene: Show the original blog article.
Voice-over: “Create smarter content with AI.”
10. Create a YouTube Shorts script
A useful article can also become a short educational video.
For example:
Hook: “Stop publishing a blog post and forgetting about it!”
Main content: “Take your article, extract its five main ideas, and use AI to generate social media updates, carousels, and video scripts.”
Conclusion: “One article can provide multiple opportunities to reach your audience.”
CTA: “Follow for more practical AI automation tips.”
Remember that the final video still needs suitable visuals, audio, editing, and platform-specific formatting.
Best AI Tools for Blog Post Repurposing
You do not need dozens of applications. Start with a small collection of tools.
| Tool | Main purpose | Best for |
| ChatGPT | Content generation | Writing social media drafts |
| Claude | Content analysis | Extracting ideas from long articles |
| Canva | Graphic design | Carousels and quote graphics |
| n8n | Workflow automation | Connecting different applications |
| Google Sheets | Content management | Reviewing generated drafts |
| Buffer | Social media scheduling | Organizing and scheduling posts |
The availability of integrations, publishing permissions, and API features can vary by platform and account.
For beginners, ChatGPT, Canva, and a scheduling tool are enough to start. You can introduce n8n when you want to automate the complete process.
How to Repurpose Blog Content with AI
Before building a fully automated system, understand the basic process.
Step 1: Choose an existing blog post
Select a useful article that contains enough information to create multiple posts.
Good candidates include:
- Step-by-step tutorials.
- Educational articles.
- Product comparisons.
- Detailed how-to guides.
- Lists of useful tips.
- Evergreen informational content.
Avoid repurposing an outdated article without checking its facts first.
Step 2: Extract the main ideas
Open your chosen article and provide its URL or complete content to an AI tool.
Ask the AI to identify:
- The main topic.
- Five important ideas.
- Three actionable tips.
- One useful example.
- One important conclusion.
- Questions readers may ask.
This creates a content foundation for the next step.
Step 3: Generate ten social media drafts
Use AI to transform the extracted information into the ten formats discussed earlier.
Give the model instructions about the platform, audience, format, tone, and call to action.
Do not ask it to generate ten nearly identical summaries.
Each post should communicate a different useful idea.
Step 4: Create visual assets
Some posts require visual content.
Use Canva to prepare:
- Carousel templates.
- Quote graphics.
- Pinterest pins.
- Educational illustrations.
- Video thumbnails.
Create a reusable template so that you do not need to design every post from the beginning.
Step 5: Review and schedule everything
Check the generated content for incorrect information, duplicated ideas, spelling errors, and inappropriate links.
Then schedule the approved drafts using a social media management tool.
Your final workflow should look like this:
Existing Blog Post → AI Content Extraction → Ten Social Posts → Human Review → Visual Design → Scheduling → Performance Tracking
How to Automate Blog-to-Social Media with n8n
Manually generating ten posts is useful, but it can still take time.
A better option is to connect your website to an AI-powered automation workflow.
With n8n, you can connect WordPress, an AI model, Google Sheets, and a publishing service.
Here is the recommended system.
What You Need
| Tool | Purpose |
| WordPress | Source of published blog articles |
| n8n | Runs the automation workflow |
| OpenAI or compatible AI model | Extracts ideas and generates posts |
| Google Sheets | Stores drafts and approval status |
| Buffer | Schedules approved social content |
Check the current integration requirements and account permissions before connecting the services.
Step 1: Configure the WordPress RSS trigger
WordPress provides an RSS feed containing published articles.
For BlogVibe, start with:
In n8n:
- Create a new workflow.
- Add an RSS Feed Trigger node.
- Enter your WordPress feed URL.
- Configure the polling schedule.
- Test the workflow with a newly published article.
The RSS Feed Trigger starts a workflow when it detects a new feed item. See the official n8n documentation.
If your RSS feed provides only an excerpt, add an HTTP Request or suitable WordPress content-retrieval step to obtain the complete article.
Step 2: Connect an AI model
Add an OpenAI node or another supported AI integration to your workflow.
Provide the article title, URL, and complete article text.
Ask the model to extract the important information and return ten distinct social media drafts.
Your instructions should include:
- Do not invent statistics.
- Do not invent quotations.
- Use only information supported by the source article.
- Keep each post unique.
- Adapt the tone to the target platform.
- Return structured JSON.
You can follow the n8n OpenAI node documentation to configure the connection.
Step 3: Save generated posts in Google Sheets
Create a Google spreadsheet called:
BlogVibe Social Media Content Calendar
Add these columns:
| Column | Purpose |
| Article Title | Original blog title |
| Article URL | Source article |
| Platform | Target social network |
| Post Format | Text, carousel, video, etc. |
| Social Caption | Generated content |
| Visual Brief | Design instructions |
| Scheduled Date | Planned publishing date |
| Approval Status | Pending or Approved |
| Publishing Status | Draft or Scheduled |
The automation should create ten separate rows for each article.
This gives you one place to organize and review all your content.
Step 4: Add human approval
Do not immediately publish every AI-generated post.
Create a review process:
- Open the Google Sheet.
- Review the generated post.
- Correct any inaccurate details.
- Approve posts that are ready.
- Keep unsuitable posts marked as Pending.
You can configure a second n8n workflow to check the approval status before sending content to your publishing service.
Step 5: Schedule approved posts using Buffer
Connect Buffer to your social media accounts.
Buffer provides an API for creating, scheduling, retrieving, and managing posts through its GraphQL interface.
The basic process is:
- Create a Buffer account.
- Connect the supported social channels.
- Generate an API key in Buffer’s API settings.
- Connect the API using an n8n HTTP Request node.
- Send approved content to the appropriate channel.
- Save the resulting publishing status in Google Sheets.
Official documentation: Buffer API Quick Start.
The API currently supports post creation and other account-management operations. The exact publishing options and media requirements depend on the connected channel and available API functionality.
Step 6: Prevent duplicate posts
Your workflow should identify articles and posts that have already been processed.
Use a unique article identifier, such as the WordPress post ID or article URL, and maintain a record of generated outputs.
Before creating new posts, check whether that article has already been processed.
This helps prevent the same article from generating duplicate content every time the workflow runs.
Step 7: Measure performance
After publishing, track the results of your content.
Useful metrics include:
- Impressions.
- Reach.
- Engagement.
- Link clicks.
- Website sessions.
- Conversions.
Use UTM parameters in your website links to help identify traffic from individual social platforms in your analytics reports.
The complete automated architecture looks like this:
WordPress RSS → n8n → Article Extraction → AI Content Generation → Google Sheets → Human Approval → Buffer API → Social Media
The workflow can automate content generation and scheduling, but visual creation, account permissions, publishing errors, and platform-specific requirements still need appropriate handling.
Copy-and-Paste AI Content Repurposing Prompt
You can also generate all ten posts manually with ChatGPT before building the technical workflow.
Copy this prompt and replace the source article with your own content.
Master prompt:
You are an expert social media content strategist and AI content repurposing specialist.
Your task is to transform one complete blog article into ten unique social media posts.
SOURCE ARTICLE:
[Paste your blog article URL and complete content]
TARGET AUDIENCE:
Bloggers, entrepreneurs, developers, content creators, and beginners.
PLATFORMS AND FORMATS:
- LinkedIn professional post.
- LinkedIn educational carousel.
- X thread.
- X standalone educational post.
- Instagram carousel.
- Instagram quote graphic.
- Facebook discussion post.
- Pinterest educational pin.
- Instagram Reels or TikTok video script.
- YouTube Shorts video script.
INSTRUCTIONS:
- Read the entire source article before creating content.
- Extract its most valuable ideas.
- Give every post a different angle.
- Do not repeat the same introduction or conclusion.
- Use simple, natural English.
- Write according to each platform’s content style.
- Create engaging but truthful hooks.
- Include relevant calls to action.
- Do not invent statistics, quotes, research, or personal experiences.
- Use only facts supported by the source article.
- Add a suggested visual concept where applicable.
- Keep all information relevant to the original article.
- Include the original article URL where appropriate.
OUTPUT FORMAT:
For each post, provide:
- Post number.
- Target platform.
- Post format.
- Headline or hook.
- Complete social media copy.
- Suggested visual.
- Call to action.
- Source section used.
Make all ten posts different, useful, original in presentation, and ready for human review.
Common Blog Post Repurposing Mistakes to Avoid
1. Copying the same content everywhere
Different platforms have different audiences and content formats.
Rewrite the same idea instead of publishing identical captions everywhere.
2. Generating content without reviewing it
AI may introduce incorrect information or misunderstand the source article.
Always check important claims before publishing.
3. Creating too many posts without a strategy
Ten posts are useful only when they serve a purpose.
Focus on the platforms that matter to your target audience.
4. Ignoring visual quality
An educational carousel with unclear text or inconsistent design may be difficult to understand.
Use readable fonts, simple layouts, and consistent branding.
5. Publishing every post at the same time
Spread your content across a reasonable publishing calendar instead of publishing everything together.
6. Forgetting to track performance
Review which content attracts engagement and website visits. Use those insights to improve your next repurposing workflow.
How to Measure Content Repurposing Performance
Your objective should not simply be to generate ten social posts.
You should understand which posts are actually helping your content strategy.
Create a basic tracking spreadsheet with these fields:
| Metric | What it tells you |
| Impressions | How often content was displayed |
| Reach | How many accounts saw the content |
| Engagement | How people interacted with posts |
| Link clicks | How many people clicked your website link |
| Website sessions | Visits attributed to social channels |
| Conversions | Whether visitors completed your desired action |
Review your results regularly.
For example, a LinkedIn post may attract more website visits than an Instagram quote graphic. This does not mean you should stop creating Instagram content, but it can help you decide where to invest more effort.
Conclusion
Blog post repurposing is a practical way to get more value from the content you already create.
Instead of writing every social media update from scratch, you can use AI to transform one article into LinkedIn posts, Instagram carousels, X threads, Facebook updates, Pinterest pins, and short-form video scripts.
With tools like ChatGPT, n8n, Google Sheets, Canva, and Buffer, you can build a repeatable process for creating, reviewing, and scheduling social media content.
Start with one useful article, generate ten different content drafts, review them carefully, and publish them according to your content calendar.
Create once, repurpose intelligently, and distribute consistently.
READ MORE:
How to Build an AI Email Automation System (Step-by-Step Guide)